Here's my walkthrough on serving gzipped JavaScript files from Amazon S3 from the PolyglotDeveloper blog:
I had originally scoured the web for a bootstrap or other tab control available, but after playing around with some HTML & Angular, I came up with this simple, functional control: 1 line of JS, 2 css selectors and 4 divs.
See the Pen World's simplest AngularJS tab control by Dan Shultz (@danshultz11) on CodePen.
If you're using Visual Studio Tools for Apache Cordova (TACO), you may notice a problem if you want to display an external webpage using the Cordova WebView, if the external page uses jQuery. Once you build and start debugging your app, as soon as you try to display the external page, an exception will be thrown in the jquery.js file used by the external page.
Before we look at what the problem is, here's a quick review of displaying external web pages in a Cordova app:
Whitelist the page/domain in config.xml in the Domain Access section under the Common tab
In JavaScript, call window.open(whitelistedUrl)
The good news about this problem, is it's not really a problem - except when you're debugging. After failing every time I tried testing opening the new window, I swapped in the non-minified jquery file (in the external page) to take a look at where we were failing. It ends up in the jquery file itself, it does a try-catch that should throw an error for all non-gecko browsers, then swallows the error:
try {
 matches.call( div, "[test!='']:sizzle" );
 rbuggyMatches.push( "!=", pseudos );
} catch ( e ) {}
...But it ends up that even though this error is swallowed, The Visual Studio TACO debugger stops the processing at the point where the error is thrown, and even if you continue processing, it usually won't display the page. Even though this code is executed on any page on the www containing jquery, when those pages are pulled into a Cordova WebView using Visual Studio TACO debugging, processing stops and the app appears to error out for no reason.
But if you run your app in Release Mode, you'll see that the page gets pulled into the Cordova WebView just fine, now that the debugger doesn't halt on the swallowed error. So the answer is that you can't debug past the point where you pull an external page into a Cordova WebView. You'll need to test that part in release mode, and if there are any problems, you can debug the page using Chrome Dev Tools on the site itself.
If this is unacceptable, another alternative would be to look into using the Cordova InAppBrowser plugin, which has no problem with external jQuery files, but the downside is that it does pop up a new browser window.
I installed the Visual Studio Tools for Apache Cordova last week to see how feasible it would be to use with an existing PhoneGap Android codebase.
I still haven't gotten to the point of publishing to Google Play yet (next post), but I thought I'd share a few of the pain points/errors I've encountered during setup and steps to resolve them:
(Note that these are specific to Android)
1) "Could not create the Java Virtual Machine" error
This is a memory issue with the JVM. The recommendation is to set your _JAVA_OPTIONS TO -Xmx512M
Full instructions
2) Error DEP10201 (No device found)
The Android emulator is a slow klunky experience. When you graduate to using your personal device to debug, you'll need to set up USB debugging. First, make sure USB debugging is enabled on your phone. On some Android phones, you first have to go to Apps..Settings..About Phone, then tap 7 times on the Build Number to enable Developer Options.
Full instructions on how to enable USB debugging on an Android phone
After enabling USB debugging on your device you will then need to
install a USB driver for debugging.
So now that we're set up to test and debug on our phone, we'll look at some of the TACO nuances and the deployment process next week - hopefully with an app successfully deployed to Google Play.
One of the little known nuances of JavaScript, is that the interpreter organizes functions and variables per scope by declaring them at the beginning of the scoping container, regardless of their order in the written script. Here's an example:
Displays:
undefinedwhereas y throws an error. So what's the difference? Neither variable has been declared when we are accessing them. Why do we only get an error when referencing y?
showVariableValues(). So in reality, our above code will be reorganized as shown below:
undefined- the JavaScript default. So that's why when we write the value of x, it's value is
undefined, whereas y just throws an error because it has not been declared.

I like V8 juice. Every morning, on the way into work, I drink a glass of V8 juice.

Today was a bit strange - we had some flurries overnight, and I had left my car outside, so it had a coating of snow, so I took a few minutes and brushed the snow off the windows before leaving.

Since I was running late, I had to take our daily Skype call via cell. Usually I do it from my laptop at my desk, but in a pinch like this, I had to take it on my Android in the car.

But during the call, I noticed out of the corner of my eye that someone was gesturing to me from the car beside me...

After watching her for a few seconds, she then started gesturing like she was taking a drink, and pointing to my roof... and it hit me... I'd left my V8 on the roof of my car! Then, double-yikes, we were out of plastic cups, and I'd used a GLASS today! - Holy crap, there was a glass balancing on my roof driving 70 MPH on the interstate!

So the first thing I did was try to get as far ahead / away from everyone else as I could, and look for the first place I could

When I finally was able to pull over and come to a stop, I got out among some curious looks, and sure enough my glass of V8 was still precariously perched on my roof. Between the snow on my roof, the wetness of the glass, and the cold temperature, the glass had become soldered to my roof with ice. In fact, it was attached so firmly that I had to pry it off. I probably could have done donuts and would have only spilled the juice. Happy ending.
The KendoUI grid comes with robust client-side functionality, and Ajax-capabilities - sorting, filtering, paging is all just built in. With the Razor wrapper, the .Pageable(), .Sortable(), and .Filterable() extension methods take care of it all. If the data you’re displaying is minimal or even a few thousand rows, this is probably the route to go – just set the grid's dataSource to Ajax, create a read action on your controller, and you’ve got a pretty robust grid.
But once you get into dealing with “large” datasets, you may want to consider implementing custom binding to get data in front of the user without the wait. When I say “large”, I mean data that takes more than a few seconds to display, or data that is likely grow quickly to an unmanageable size. In our scenario the size of the dataset could be up to 25 Mb, but even after compressing it to 800k, it was taking several seconds to send the data from the server to the browser and then display the data in the grid. After the painful initial wait though, paging, sorting, filtering was then instantaneous since the data was all client side. But what to do about the initial wait?
That’s where custom binding can help out. By implementing custom binding, you can combine the best of Ajax and Server binding to quickly deliver large datasets to your users. A small drawback is that all the sorting, filtering, paging has to be handled in the controller method. Fortunately Kendo makes this fairly easy by automatically passing collections of criteria on the request object – here’s a quick overview of server code required to manually implement paging, sorting and filtering when implementing custom binding.
One other thing to remember when implementing custom binding is that Server caching of the dataset is something to keep in mind – especially if the db call takes more than a second or two. With custom binding, we’re calling back to the server on every filter, page, or sort event – so we don’t want to make a db call on top of that every time. This is true even (and especially) if we use Kendo’s Server databinding instead of Ajax databinding. So anyway, if you’re using Kendo’s data grids, the out of the box Ajax binding is a good, easily implementable solution, but if you’re dealing with large amounts of data, you’ll want to look into custom binding.
Full Razor code for grid with custom binding enabled:

@(Html.Kendo().RangeSlider()

    .Name("RangeSlider")

    .Max((double)Model.RevenueUpperBound)

    .Min((double)Model.RevenueLowerBound)

    .Values(Model.MinVal, Model.MaxVal)

    .Events(events => events.Change(x => "updateVals")))
function resetSlider(){

  //Get a handle on our element's RangeSlider
  var slider = $('#RangeSlider').data('kendoRangeSlider')

  //Feed it an array of two numbers.
  slider.value(new Array(10, 111))

}
That's it... As easy as 3.14.


<!-- WinJS references -->
<script src="//Microsoft.WinJS.1.0/js/base.js">
</script>
<script src="//Microsoft.WinJS.1.0/js/ui.js">
</script>
<script src="/js/default.js"></script>
<link href="//Microsoft.WinJS.1.0/css/ui-dark.css"
rel="stylesheet" />
{
  "name": "My Cool App",
  "description": "This is a test of the Chrome Web Store",
  "version": "1.0.0.1",
  "app": {
    "urls": [
      "*://www.yourwebsite.com /mail/",
      "*://www.yourwebsite.com /otherarea/"
    ],
      "launch": {
      "web_url": "http://www.yourwebsite.com/"
    }
  },
  "icons": {
    "128": "icon_128.png"
  },
  "permissions": [
    "unlimitedStorage",
    "notifications"
  ]
}
Note that you need to specify a launch URL, as well as any other non-asset URLs you'll be using. And you will need to verify that you are the owner of this site using Google's Webmaster Tools.
One of the great benefits of doing mobile development using PhoneGap is the portability of the codebase. The same HTML application is easily wrapped and built for all major devices using PhoneGap and/or PhoneGap Build. And since your app is written using HTML, CSS and Javascript, you can make it accessible as a web app as well.
After I had already published a few apps to the Android Market using this technique, I read about the Chrome Web Store. And once I digested their publishing and deployment specs, I noticed that the same PhoneGap codebase could easily be deployed to this outlet as well. I re-deployed the same apps to the Chrome Web Store a few months ago, and my experience was so positive, I wanted to share a quick overview of how to deploy to this store, and some things you'll want to think about:
The deployment is simple for Chrome Web Store Packaged Apps - basically you create a .zip file of your HTML app, along with a simple .manifest file, the app icons, and preview images. Here's a sample manifest that launches splash.html at the root of your app:
{
  "name": "My Cool App",
  "description": "This is a test of the Chrome Web Store",
  "version": "1",
  "app": {
    "launch": {
      "local_path": "splash.html"
    }
  },
  "icons": {
    "16": "icon_16.png",
    "128": "icon_128.png"
  }
}
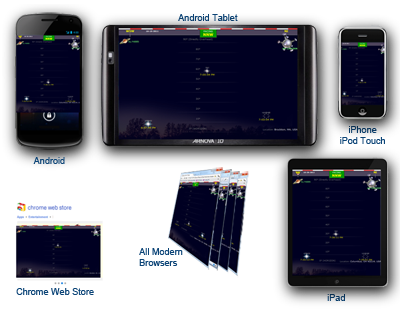 Our sample app (links to all versions below) is going to call the Google Geocode API as well as the Heavens Above API to display viewing information for the next pass of the International Space Station based on the desired position. For progressive enhancement, our app will allow mobile device users to merely use their device coordinates, and allow HTML5-enabled users to have access to their history of locations using HTML5 LocalStorage.

We just got through a minor issue involving NewsItems in a Sitefinity 4.1 implementation. The problem is that even though the administrators were specifying an author when creating NewsItems, THEIR NAME was being displayed instead of the author no matter what.
The solution is actually pretty straightforward - The layouttemplate for news items doesn't contain a field for author, even though it's entered on the back end. Instead it uses <sf:personprofileview runat="server"> which displays the first name and last name of the user posting the NewsItem. You'll have to go into the LayoutTemplate for single NewsItems (Design..WidgetTemplates...FullNewsItem in Sitefinity admin) and replace the personprofileview tag with the author name:
Default layouttemplate code:
<div class="sfnewsAuthorAndDate">
<asp:literal runat="server" text="<%$ Resources:Labels, By %>">
<sf:personprofileview runat="server">|<sf:fieldlistview format="{PublicationDate.ToLocal():MMM dd, yyyy}" id="PublicationDate" runat="server">
</sf:fieldlistview>
</div>
Revised:
<div class="sfnewsAuthorAndDate">
<asp:literal runat="server" text="<%$ Resources:Labels, By %>">
<asp:Literal runat="server" Text='<%# Eval("Author")%>' /> | <sf:fieldlistview format="{PublicationDate.ToLocal():MMM dd, yyyy}" id="PublicationDate" runat="server">
</sf:fieldlistview>
</div>


